Objective
Do your project according to the following general guidelines, but we’re going to do a small button pack instead. The buttons will follow my specs. The way you package them is up to you.
- You’ll have 6-12 buttons, packed up somehow (as simple as a baggie with a top staped) and a written description.
You are to create a poster whose general theme is Amarillo at a Glance. You are to create imagery that gives a brief overview of what can be found in Amarillo. This can consist of landmarks, motifs, historical spots, economic draws, or whatever you feel is relevant to giving a brief glimpse of what Amarillo is about. Your piece should not give a negative view of the town. Consider this more like a piece that would be commissioned by the city.
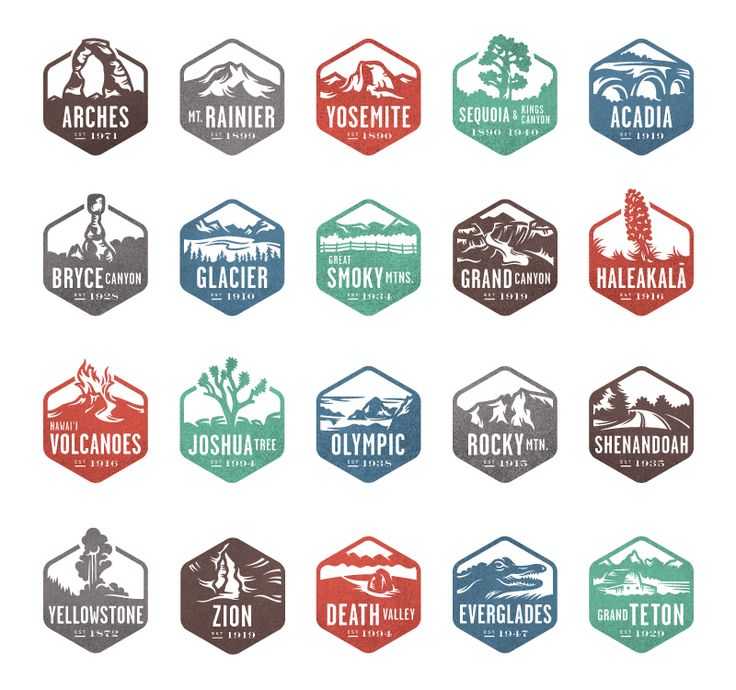
The poster will be comprised of 12 forms whose structure is the same in each instance, just with differing imagery and type in them. The style from one form to another must be consistent. As you are to use only one color in each, photography-inspired imagery will need to be reduced to positive and negative space. Your imagery should be such that it can work at a small size (think 1in x 1in) or a large size.
You can be more specific with your poster if you want. For example, if you wanted to focus on the wildlife in Amarillo, you could show 12 different animals that are common here, and your title could be something like “Amarillo: A Land of Many Creatures.”
Specs
- Each form will use only one color.
- You will use only two typefaces: one for the title and one for the descriptor.
- You will endeavor to use two typefaces that work together because of their skeletal structure. The typefaces should be a serif and sans serif whose general proportions are similar, or there should be vast contrast between the two typefaces you choose.
- You can use up to 6 colors total.
- 13x19in, with 1 inch margin.
- Your poster needs a title (Amarillo) and a subtitle (which has to do with the direction you’ve taken with your poster) using the same two typefaces used in the forms above.
Unless you present and have another suitable style approved, your forms should depict actual objects that appear to exist in 3 dimensions. They should just be reduced and stylized so that they work in one color. See the reference image for guidance, and an example.
Making Buttons
You will take the art you have created and reformat it so that it will work for 1.25in buttons. Your title and subtitle should go away, and your imagery will become all that exists within the new circular version of the “logos.”
You will also apply your type choices (from the original marks) to a button holder template, which is included with the template files below. Retain the layout in place, and the general type sizes, though yours may be adjusted slightly if the typeface calls for it. You should have your title and subtitle at the top, and the main labels for each icon/logo under each button.
We will print and produce the buttons and holder sheets at the end of the project, in class. You should have your art ready for class, in case anything needs to be modified.
- Button/Holder Templates
- Button Instructions
Use this, in addition to what’s shown in class, as guidance in building your button pack.
Reference
Instructions
Sketching
Do your sketchbook 11 assignment, which will also serve as your first round of sketching for this project. You should pick three different approaches (they can be different conceptually, visually, or both) and sketch 12 different items/locations/images for each (for a total of 36 items). Due 4-12-16.
Choosing your best set
We’ll look at your sketches and choose the path you will take forward, and you’ll build out a poster (which really is a set of icons) as vector items.
Create Buttons
You’ll create a button pack from the images you’ve created and using the templates and instructions given above.
Overview
The following shows an overview of what you will be creating. Click for a larger view.
![]()
- You’ll place all your icons (which use two typefaces within each) on a simple poster, structured like the above.
- You’ll then simplify those icons so they work on circle buttons, and we’ll produce those in class.
Submission
- Turn your working files and pdfs for the poster, buttons, and button holder into the class drop box labeled [lastname_f_project5] by the end of class on the due date.
- Turn in, to me, your buttons on their craft paper backing by the end of class on the due date as well.
- You do not need to print your poster.
Note: April 21 will be an open lab day (attendance not required), and on April 26th, I will introduce the last project; any more production that needs to be done for this project can be finished up. If you’re finished with your production on the buttons, you can take off after the project is introduced on Tuesday, April 26.